
How to Make a WordPress Website from Scratch with 90+ Speed Score Using Elementor
Website speed plays a critical role in user experience, SEO rankings, and conversion rates. A slow website can increase bounce rates and reduce trust in your brand. Google now prioritizes fast-loading websites through its Core Web Vitals (CWV) metrics.
In this guide, you’ll learn how to build a WordPress website from scratch using Elementor and optimize it to achieve 90+ scores on Google PageSpeed Insights for both mobile and desktop.
What Are Core Web Vitals (CWV)?
Core Web Vitals are Google’s performance metrics that measure real user experience. They focus on three main factors:
1. Largest Contentful Paint (LCP)
Measures how fast the main content loads.
Ideal score: Under 2.5 seconds
2. Interaction to Next Paint (INP)
Measures how quickly the website responds to user actions.
Ideal score: Under 200 ms
3. Cumulative Layout Shift (CLS)
Measures visual stability (unexpected layout movement).
Ideal score: Less than 0.1
If these metrics are optimized, your website has a higher chance of ranking better on Google.
Step 1: Choose the Right Hosting
Your hosting provider directly affects website speed. Always choose performance-focused hosting with:
- SSD or NVMe storage
- LiteSpeed or NGINX server
- Built-in caching
- Free CDN
- PHP 8+
Recommended options:
- Cloud-based hosting
- Managed WordPress hosting
- LiteSpeed servers
Avoid cheap shared hosting if speed is your priority.
Step 2: Install Lightweight WordPress Theme
For Elementor websites, your theme should be fast and minimal.
Best options:
- Hello Theme (Official Elementor theme)
- Astra
- GeneratePress
- Kadence
For maximum speed, Hello Theme is recommended because it has no unnecessary code.
Step 3: Install Elementor Properly
Install:
- Elementor (Free)
- Elementor Pro (Optional)
Avoid installing unnecessary addons. Every extra plugin adds load to your website.
Only install what you really need.
Step 4: Optimize Elementor Settings
Go to:
WordPress Dashboard → Elementor → Settings → Advanced
Enable:
- Load Icons Inline
- Load Font Awesome Inline
- Optimize DOM Output
- Load Icons Inline
- Improve Asset Loading
Then go to:
Elementor → Tools → Regenerate Files & Data
This cleans unused files.
Step 5: Use Performance Plugins
Install a good caching and optimization plugin:
Recommended:
- WP Rocket
- LiteSpeed Cache
- W3 Total Cache
For free option:
- LiteSpeed Cache (if supported by hosting)
Enable:
- Page caching
- Browser caching
- GZIP / Brotli
- Minify CSS/JS
- Combine files
- Lazy Load
Step 6: Optimize Images Properly
Images are the biggest cause of slow websites.
Best practices:
- Use WebP format
- Compress images before upload
- Serve responsive images
- Lazy load images
Recommended plugins:
- ShortPixel
- Smush
- Imagify
Always keep image size under 200KB when possible.
Step 7: Use CDN (Content Delivery Network)
A CDN delivers your website from servers near users.
Popular CDNs:
- Cloudflare
- Bunny CDN
- StackPath
Benefits:
- Faster loading worldwide
- Reduced server load
- Better security
Cloudflare Free plan is enough for most websites.
Step 8: Reduce Plugins and Scripts
Too many plugins slow down your site.
Do this:
- Remove unused plugins
- Replace heavy plugins with lightweight ones
- Avoid multiple builders
- Avoid multiple sliders
Try to keep plugins under 15–20 for best performance.
Step 9: Optimize Fonts and Icons
Fonts and icons affect loading speed.
Best practices:
- Use only 1–2 fonts
- Host fonts locally
- Disable Google Fonts if not needed
- Use SVG icons instead of icon libraries
In Elementor Pro, enable local font hosting.
Step 10: Fix Core Web Vitals in Elementor
Fix LCP (Largest Contentful Paint)
- Optimize hero section image
- Use WebP
- Preload main image
- Avoid heavy sliders
- Use static hero section
Fix INP (Interaction Delay)
- Reduce JavaScript
- Disable unused scripts
- Use defer and async
- Remove heavy animations
- Optimize third-party scripts
Fix CLS (Layout Shift)
- Set image dimensions
- Avoid dynamic ads
- Reserve space for widgets
- Don’t load fonts late
These steps help stabilize layout.
Step 11: Optimize Database
Over time, WordPress database becomes heavy.
Clean regularly:
- Revisions
- Drafts
- Spam comments
- Transients
Use plugins like:
- WP-Optimize
- Advanced Database Cleaner
Step 12: Enable Lazy Load & Preload
Lazy loading delays loading off-screen elements.
Enable:
- Image lazy load
- iFrame lazy load
- Video lazy load
Also preload:
- Fonts
- Hero image
- Critical CSS
This improves LCP score.
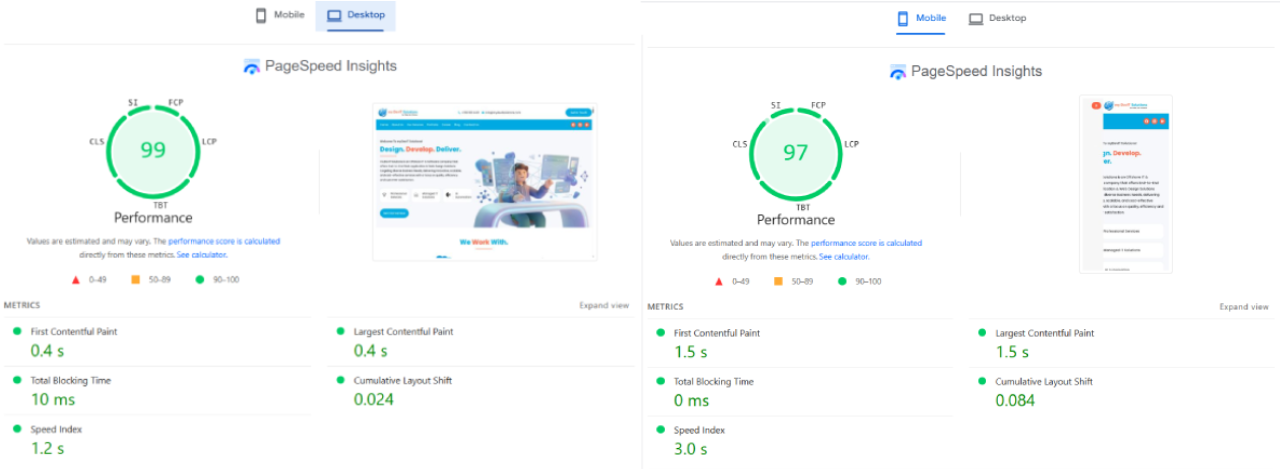
Step 13: Test with Google PageSpeed Insights
After optimization, test your website:
Check:
- Mobile score
- Desktop score
- CWV status
Aim for:
✅ Performance: 90+
✅ CWV: Passed
✅ LCP: <2.5s
✅ CLS: <0.1
Common Mistakes to Avoid
❌ Using heavy multipurpose themes
❌ Uploading large images
❌ Installing too many addons
❌ Ignoring mobile performance
❌ Using low-quality hosting
Avoiding these saves months of optimization work.
Final Thoughts
Creating a fast WordPress website with Elementor is completely possible when done correctly. By choosing the right hosting, lightweight theme, optimized plugins, and following Core Web Vitals guidelines, you can easily achieve 90+ PageSpeed scores on both mobile and desktop.
Speed is not just about SEO—it improves user experience, increases conversions, and builds trust.
If you implement the steps in this guide, your Elementor website will be future-ready, fast, and Google-friendly.